Introduction
Scope
This installation guide is intended for IT administrators who are installing Implicit Outlook Integration on Citrix, Remote Desktop or other VDI platforms.
Overview
Implicit for Outlook consists of two components:
Implicit for Outlook Add-in – This is an outlook Add-in that is installed via Microsoft 365 admin center. It shows up as a side-panel in Outlook. Key features include:
- Information about related clients, services cases, plans and tasks.
- Viewing intelliflo office records directly from Outlook.
- Multitude of tools to archive emails and attached documents from Outlook to intelliflo office, including ‘One-Click’ and ‘Advanced Archiving’.
- Robust browsing and searching capabilities across clients, leads and related records.
Implicit for Outlook Desktop App – A Windows taskbar application that works in conjunction with the Outlook add-in to augment its functionality with background processing. Key features include:
- Synchronization of Outlook and intelliflo office calendars
- Robust browsing and searching capabilities across clients, leads and related records.
Supported Platforms
- Microsoft 365 business basic / standard / premium or Enterprise
- Microsoft Personal 365 and Outlook.com
- Windows 11, Windows 10, Windows Server 2025/2022/2019/2016
- Microsoft Outlook for Windows – Classic and New
- Microsoft Outlook for Mac (Parallels Desktop is required)
- Microsoft RDS, Azure Virtual Desktop (AVD), Citrix, VDI
Admin Installation
Prerequisites and Dependencies
- Before proceeding, ensure that you are signed in as a Global Administrator or Exchange Administrator in Microsoft 365.
- Implicit Desktop app has a dependency on Microsoft .NET 8. Prior to installing the Implicit Desktop App, the interactive installer will first check for .NET 8.0.x prerequisite. Implicit Desktop app will work with any.NET 8 Desktop Runtime version higher than 8.0.18 (minimum version). If the installer does not detect at least the minimal version, it will automatically connect to Microsoft download center and prompt you to install it. Note: If you are manually upgrading your .NET Desktop Runtime version, we recommend you upgrade to the latest .NET 8 desktop runtime version. Please see: https://dotnet.microsoft.com/en-us/download/dotnet/8.0/runtime/desktop
Step 1: Installing Implicit Desktop App on RDS Session Server for all users
The Implicit Desktop App runs on users’ desktops as a taskbar app in Windows. To install it in Citrix / RDS or VDI environments, please download and install the executable installer on the RD session host server and ensure that all users have the necessary permissions to access it.
Download Implicit Desktop AppThe installer will first check if you have the required version of .NET Desktop Runtime version and if not will prompt you to install it from Microsoft download center. Then it will run the Implicit Desktop App installation.
After installation, when users will login to their desktop session, they will be prompted to sign-in to their Microsoft 365 and their intelliflo office accounts in order to link these two accounts. Please inform your users to follow the instructions in “Linking your Microsoft 365 and intelliflo office accounts” section of the User Guide.
Step 2: Granting Implicit Desktop App permissions to access Microsoft 365
Implicit Desktop App needs permissions to access data on users’ 365 mailboxes. The required permissions are:
- Access to users’ calendars – to sync with intelliflo office diary.
- Access to users’ mail – to retrieve emails from users’ mailboxes and archive them in intelliflo office.
In order to prevent Microsoft 365 from prompting users to accept these permissions (which might be confusing to some users), Implicit made the provision for an administrator to grant the Desktop App these permissions on behalf of users. To approve, please click the following button:
Grant Permissions on Microsoft 365
Step 3: Deploying Outlook Add-in via Admin Center
This section outlines the step-by-step process for deploying Implicit for Outlook add-in organization-wide using the Microsoft 365 admin center.
1. Sign in to Microsoft 365 Admin Center
Sign in with your administrator credentials to Microsoft 365 Admin Center by going to https://admin.microsoft.com.
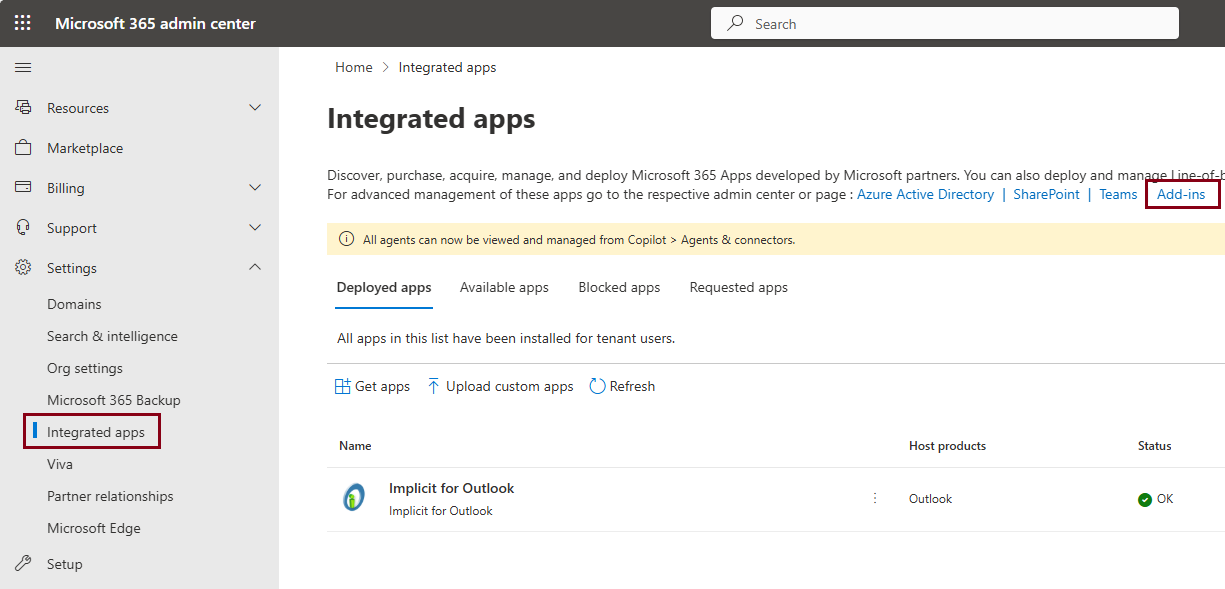
2. Access Integrated Apps
In the left-hand navigation panel, expand ‘Settings‘ and click ‘Integrated apps‘.
3. Click ‘Add-Ins’
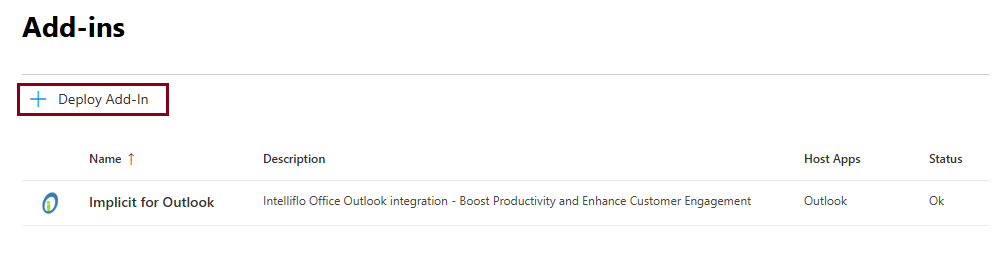
4. Click ‘+Deploy Add-In’:
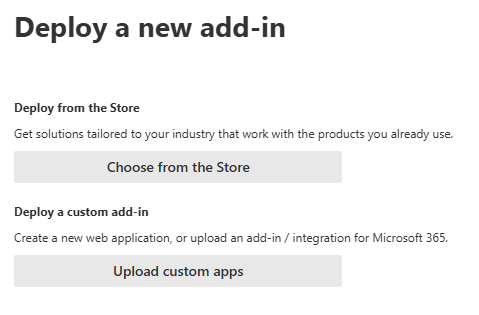
5. Deploy New Add-In
On the ‘Deploy New Add-In’ screen – select ‘Upload Custom Apps’
6. Select “I have a URL to a manifest file”
Next, select ‘I have a URL for the manifest file’ and enter the following URL:
https://apps.outlook-integration.com/intelliflo-rds/outlook/manifest.xml
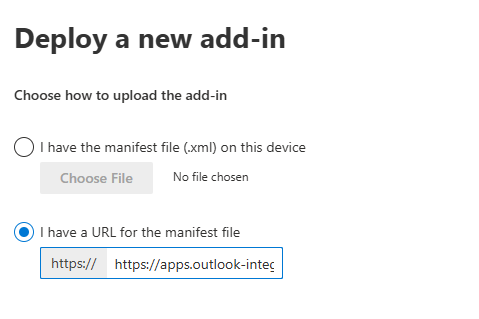
Important Microsoft 365 user interface is a little confusing as it implies that “https://” is included but it expects you to include the “https://” in the URL that you enter.
7. Select users and deployment method:
Select the users who would have access to the add-in and the deployment method:
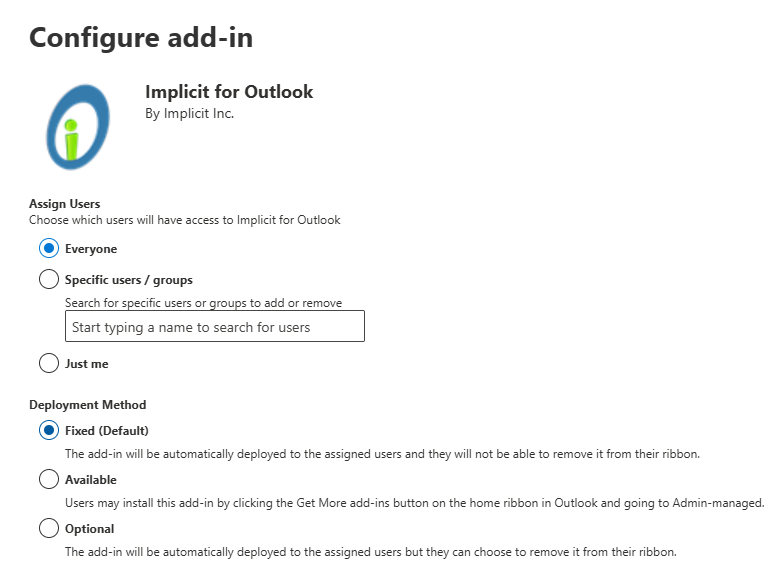
User selection:
You have an option to select the following:
- Everyone – All users under this Microsoft 365 tenant (quickest way to deploy)
- Specify Users / Groups – If you want to limit the deployment to only a group of users, we recommend creating a user group on Microsoft Azure that would include all the users that the intelliflo Outlook integration would be deployed to and selecting that group here. This way it’ll be easier for you to manage and add/remove users.
Note: Deploying to groups takes longer to deploy add-ins to users as compared with “Everyone”.
- Just Me – The add-in will be deployed to your account only.
Deployment Method
We recommend selecting the default ‘Fixed’ method.
8. Final Step
Upon successfully deployment of the add-in on Microsoft 365, you should receive the following confirmation message that the add-in has been deployed.

9. After the add-in has been deployed to users
Note: Important Note: It may take up to 24 – 72 hours for the add-in show up in users’ Outlook ribbon. Please notify users that they might need to exit and re-launch Outlook for the ‘Implicit for Outlook’ button to appear.
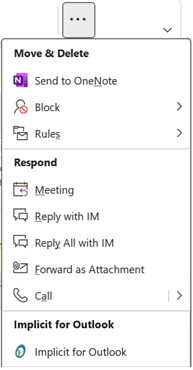
When Implicit for Outlook has been deployed to Outlook, it will appear on the ribbon in Outlook as shown below:

Note: Depending on the number of buttons you have configured on your Outlook ribbon, the Implicit button may also show up on the ‘More Commands’ (‘…’) button as show below:
Installation Checklist
- I have deployed Implicit Desktop App on the session host server and made sure all users have permissions to access it (as described in Step 1)
- I have granted Implicit Desktop App permissions to access users’ Microsoft 365 accounts (as described in Step 2)
- I have notified users that upon their next sign-in to their virtual desktops, they would be prompted to link their Microsoft 365 accounts with their intelliflo office account (as described in the User Guide)
- I have installed Implicit Outlook add-in on the corporate Microsoft 365 account (as described in Step 3)
- I have notified users that the add-in has been deployed and that it might take 24 – 72 hours for it to show up in their Outlook.
- I have also notified users that once the add-in is visible in Outlook, they should click on the “Implicit for Outlook” button to open the side panel and follow the instructions on how “Activating the Outlook Side-Panel” in the user guide.