Introduction
Overview
Implicit Outlook Integration extends intelliflo office functionality and user experience into Outlook by:
Providing financial advisors with contextual information and instant visibility into relevant intelliflo office information as they interact with their clients and leads via Outlook, enabling them to respond faster and more effectively.
Streamlining and automating data flow from Outlook – including emails, documents and appointments – into intelliflo office.
The new integration is feature-rich yet intuitive and easy to use, seamlessly blending itself into advisors’ daily use of Outlook as natural part of Outlook—no extra steps, no learning curve, just smarter work.
As an Outlook side-panel running alongside email inbox, it automatically identifies clients’ and leads’ emails and provides real-time insights as users read or compose messages. Users can browse, search and view intelliflo office directly from Outlook including clients, leads, service cases, plans and tasks.
Implicit facilitates the flow of input data from Outlook to intelliflo office by providing a variety of tools for both manual and automatic archiving of emails, ranging from a single-click to advanced multi-record options and rule-based auto-email archiving engine. These tools ensure that every client or lead interaction is accurately logged and easily traceable in intelliflo office.
The deployment and management of the Outlook add-in has been greatly simplified with centralized administration through Microsoft 365.
The Implicit integration saves time and enhances advisors’ productivity by allowing them to focus on what matters most – strengthening client relationships.
Key Features
- Side-Panel – Runs alongside your inbox, automatically identifying client’s and leads’ emails and providing instant visibility into Intelliflo Office records, enabling you to respond faster and more effectively. It displays information about related clients, services cases, plans and tasks.
- Access intelliflo office Records – It saves you time by allowing you to view intelliflo office records directly from Outlook as well as provide robust browsing and searching capabilities across clients, leads and their related records.
- Email Archiving – Streamline data flow from Outlook including emails and documents into intelliflo office. Implicit for Outlook provides a multitude of tools to archive emails and attached documents from Outlook to intelliflo office, including ‘One-Click’ and an ‘Advanced Archiving’ tool with more flexible options, allowing you to select which intelliflo office records to archive against, and control how emails and attachments are archived in intelliflo office.
- Automatic Email Archiving – To further save you valuable time and help you meet regulatory requirements; Implicit for Outlook allows you to automate the process of email archival in intelliflo office by defining rules for auto-email archiving.
- Calendar Sync – Full two-way sync of Outlook / Teams calendars with intelliflo office.
Components
Implicit for Outlook consists of two components:
- Implicit for Outlook Add-in – This is a Microsoft 365 Add-in that is installed from Microsoft AppStore by either administrators on corporate accounts or by users on their individual accounts. It shows up as a side-panel in Outlook which becomes active when emails are selected and displays relevant Intelliflo office context for emails.
- Implicit for Outlook Desktop App – A Windows taskbar application that works in conjunction with the Outlook add-in to augment its functionality with background processing. The desktop app is installed by users directly from the Outlook side-panel or by administrators using silent network-based software deployment tools.
Trademarks
Implicit, the Implicit Logo, Implicit for Outlook and Implicit Sync and combinations thereof are trademarks of Implicit Inc.
intelliflo, intelliflo office, intelliflo store are a registered trademark of Intelliflo limited.
Microsoft, Microsoft Office, Microsoft Outlook, Microsoft Teams, Microsoft 365, and Windows are registered trademarks of Microsoft Corporation.
Other product names used in this publication are for identification purposes only and may be trademarks of their respective companies.
Disclaimer
The contents of this document are provided in connection with Implicit Inc. (“IMPLICIT”) and Implicit for Outlook product. IMPLICIT makes no representations or warranties with respect to the accuracy or completeness of the contents of this publication and reserves the right to make changes to specifications and product descriptions at any time without notice. No license, whether express, implied, arising by estoppel, or otherwise, to any intellectual property rights are granted by this publication. Except as set forth in Implicit for Outlook License Agreement, IMPLICIT assumes no liability whatsoever, and disclaims any express or implied warranty, relating to its products including, but not limited to, the implied warranty of merchantability, fitness for a particular purpose, or infringement of any intellectual property right. IMPLICIT’s products are not designed, intended, authorized or warranted for use as components in applications intended to support or sustain life, or in any other application in which the failure of IMPLCIT’s product could create a situation where personal injury, death, or severe property or environmental damage may occur. IMPLICIT reserves the right to discontinue or make changes to its products at any time without notice.
Supported Platforms
Microsoft Outlook
• Microsoft 365
• Microsoft Outlook on Windows (Windows 11, Windows 10, Windows Server 2019, Windows Server 2016, Windows Server 2012 R2)
Linking your Microsoft 365 and intelliflo office accounts
Upon completion of the installation, the following two software components should be installed:
Implicit for Outlook Add-in – The Add-in should be installed by your IT admin and deployed to users’ Outlook. It may take up to 24-72 hours to show up in Outlook.
Implicit Desktop App – The Implicit Desktop App has been deployed by your admin (or yourself) on your desktop. If you have installed the Desktop App yourself, you will immediately be prompted to configure it. If it has been silently installed over the networks by your admin, you will be prompted to configure it upon the next time you sign in to your PC. The Welcome screen will appear:
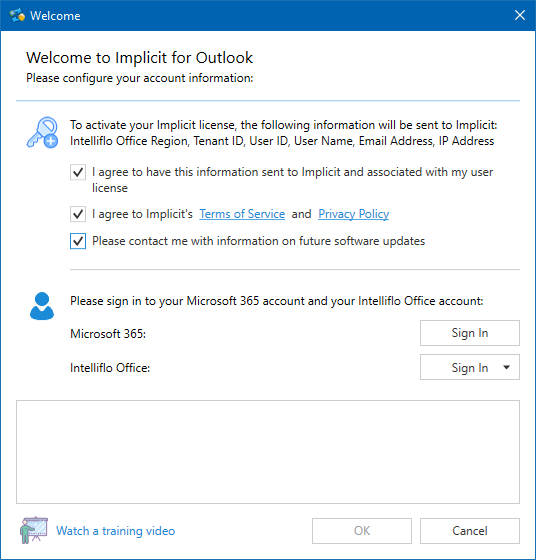
You are prompted to agree to Implicit’s Terms of Service, Privacy Policy and End User License Agreement (EULA). Please carefully review Implicit’s Terms of Service, Privacy Policy and End User License Agreement and check the checkbox to indicate that you agree.
You are also prompted to give your consent to having certain private information sent to Implicit, to be associated with your Implicit license. This information includes: your intelliflo office Tenant ID (which identifies your organization), your intelliflo office user ID, your name, email address and your IP address. Please review the information and check the checkbox to give your consent.
Next, click the “Sign In” button, to sign in to your Microsoft 365 account. Please make sure to select the same exact account that you will be using in Outlook. You will be prompted to login to Microsoft 365 and if successful, your email address will be displayed.
Similarly, click the “Sign In” button, to sign in to your intelliflo office account. You will then be prompted to grant permission to Implicit for Outlook to access certain personal and financial data in order to provide you with access to this data from within Outlook.
If you agree, click “Yes, allow”, otherwise click “No, Do Not Allow”.
Note: All permissions are required for Implicit for Outlook to work!
If you do not agree with Implicit’s Terms of Service, Privacy Policy or End User License Agreement or do not consent to having your private information sent to Implicit or do not wish to allow the permissions required on intelliflo office, please click Cancel below to exit Implicit Desktop App, and uninstall the software from your desktop.
If you’ve successfully signed in to intelliflo office and granted the required permissions, your intelliflo office user ID will be displayed on the dialog next to the Sign In button. When both your intelliflo office user ID and your Microsoft 365 email address are displayed, that means that you have successfully completed the installation of Implicit Desktop App and your intelliflo office account is now linked to your Microsoft 365 account.
Click OK to exit. The following message will show up on the bottom-right side of the screen above the Windows taskbar.
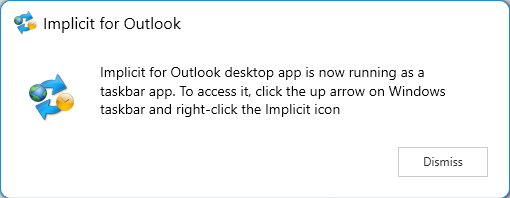
Note: The app will run as a background Windows taskbar application and synchronizes data between Outlook and intelliflo office. If at any time it is stopped, please run it again by entering “Implicit for Outlook” in the Search Box in the Windows taskbar.
Activating Outlook Side-Panel
Now that you have linked your Microsoft 365 and your intelliflo office accounts, you are ready to start using Implicit for Outlook as soon as the Implicit button shows up in your Outlook ribbon. As we mentioned, it may take up to 72 hours for the add-in to be deployed to users’ Outlook.
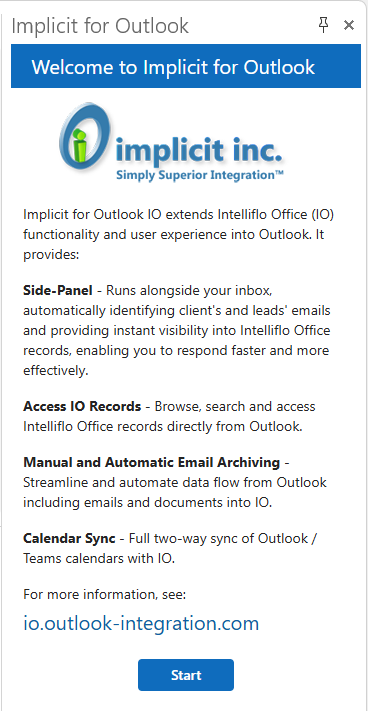
When the Implicit for Outlook button is visible, click it to launch the side panel. The side-panel will display the welcome screen.
Step 1. Welcome screen
Step 2. End User License Agreement
Step 3. Final Confirmation
The side-panel will display a confirmation message to indicate that it is ready.
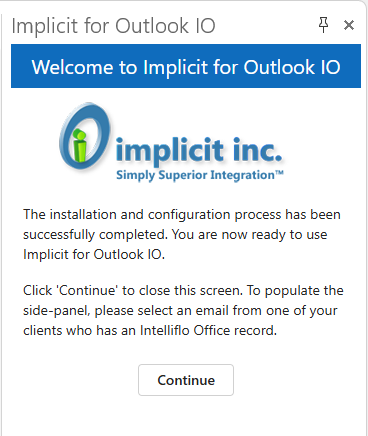
To make sure the integration is working, select an email from an intelliflo office client and you should see the side panel populated with the client’s information
Email Side Panel
Overview
The Email side panel is an extremely useful and functional feature to view relevant CRM information related to emails’ senders/recipients and take immediate actions.
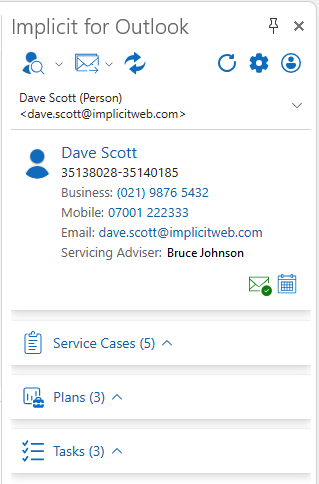
Implicit for Outlook run as a side-panel in Outlook alongside your emails and provides the following functionality:
- View clients’ & leads’ information – The side-panel automatically identifies clients’ and leads emails and provides their intelliflo office information including contact information and the most recent business activities such as services cases, plans, tasks etc.
- Direct access to intelliflo office records – Directly access intelliflo office records simply be clicking on the record on the side-panel.
- Browse & search records – Browse/search your intelliflo office clients, leads, services cases, plans and tasks.
- Manual Email Archiving – Provides a simple single-click archiving to a record on the side panel and an advanced multi-record archiving tool.
- Auto-Email Archiving – Streamline and automate data flow from Outlook including emails and documents by defining custom rules for automatic email archiving into intelliflo office.
The data section side panel is divided into multiple sub-sections:
- Client / Lead information – Name, ID and contact information of the client or lead
- ‘Related To’ Client List – List of email recipients and ‘related to’ clients.
- Client’s Records – The most recent service cases, plans and tasks.
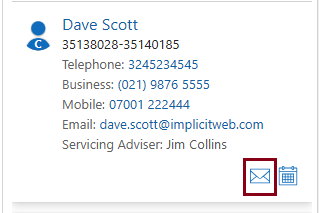
Client / Lead Information
The client/lead section includes the client’s name, reference number, contact information and advisor’s name.
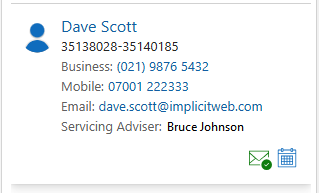
Actions
- Clicking on opens the client’s record in intelliflo office.
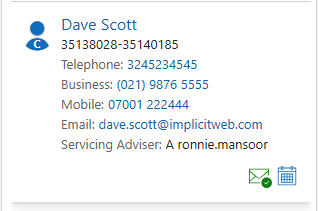
- Clicking the envelop icon will archive the email against the client’s record. When the email is archived, the icon changes its color to green and displays a check mark to indicate that the email has been archived to the client’s record.
- Clicking the calendar icon will open an outlook meeting invite and pre-populate the client as a meeting participant.
Above the client/lead section, you’ll see the drop-down list:
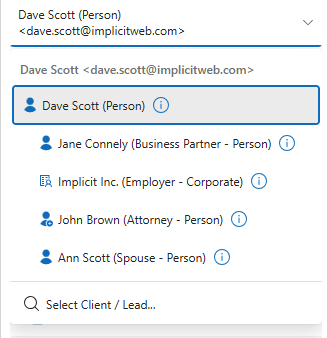
This list includes:
- The primary client/lead that was identified for this email.
- Any joint or other clients related to the primary client.
- Other clients with matching email address.
- All other recipients that were included in the email if they have a record in intelliflo office.
You can use this list to do the following:
- Switch and relate the email to a client, different than the one who sent it. For example, if the email was sent by a lawyer or a CPA, you can switch and relate the email to the actual client’s record.
- Relate the email to a joint client.
- If there are multiple clients with the same email address, you can select the one you want.
- Search and select a different client/lead if not included as a recipient in the email. For more information see Browsing / Searching for a Client/Lead.
Service Cases, Plans and Tasks
These sections provide a list of the most recent records for the selected client sorted by date. You can extend or collapse this section by clicking on the up or down arrows. You can configure the maximum number of records to display in the side panel (Options General tab). The number in parentheses indicates the number of actual records available to display.
Service Cases
The service cases section includes the service case name, reference number, service case category, the date it was created, status, if it’s a joint service case and the name of the advisor:
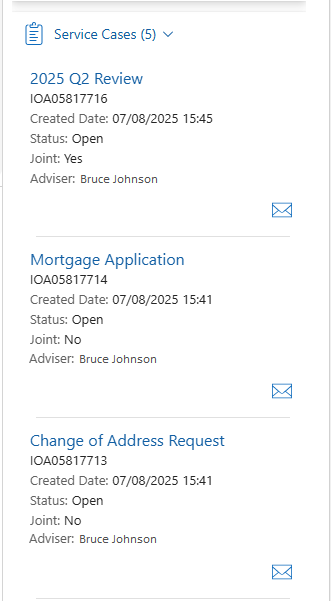
Actions
- Click on the name of the service case opens the service case intelliflo office.
- Clicking the envelop icon archives the email against the service case’s record.
- You can also click ‘View all in Intelliflo Office’ to view the list of all the client’s service cases in intelliflo office.
Plans (or Products)
The plans section includes the sequential reference of the plan, the provider and the name of the product, policy number, start date, Top Ups and the name of the advisor.
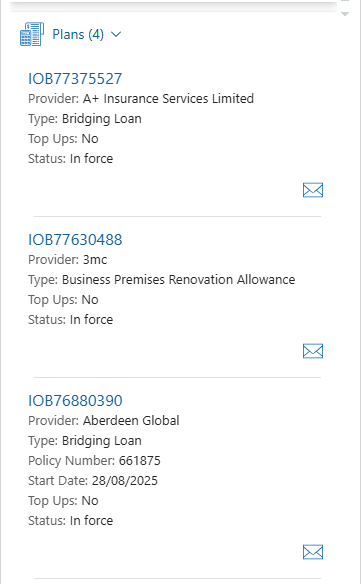
Actions
- Clicking on the plan’s sequential reference opens the plan’s record in intelliflo office.
- Clicking the envelop icon archives the email against the plan’s record.
- You can also click ‘View all in Intelliflo Office’ to view the list of all the client’s plans in intelliflo office.
Tasks
The tasks section includes the task’s name, start and due dates, status, tasks’s category and type, reference number, the user it is assigned to, priority and percentage of completion.
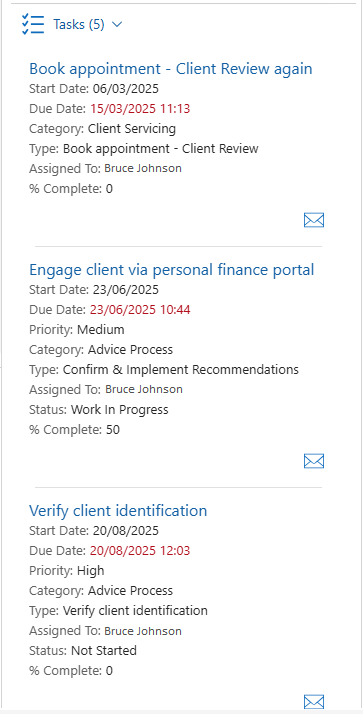
Actions
- Click on the task’s name opens the task’s record in intelliflo office.
- Clicking the envelop icon archives the email against the task’s record.
- You can also click ‘View all in Intelliflo Office’ to view the list of all the client’s tasks in intelliflo office.
Relating the email to another Client / Lead
If the email was not received or sent to the client/lead that it is related to and was also not included as a recipient in the email, click ‘Select Client/Lead…’ from the ‘related to’ drop-down list. A search window opens up and allows you to search and select a different client/lead. The side-panel will now display the information of the client/lead that you have selected.
Creating a Client Record from Email
If the email was received or sent to an email address that is related to either a client or a lead record in intelliflo office (for example if the client sent an email from an email address unknown to the system), the side panel will display the following:

You can either search and related the email to the actual client/lead record or you can click ‘Quick Create Client’ to directly open the ‘Quick Create Client’ page in intelliflo office.
Important Note: When you create a new client record, make sure to enter the same email address as in the email. When you switch back to Outlook, please click the refresh button to display the information of the client you just created.
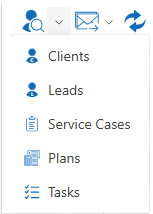
Browsing and Searching intelliflo office Records
Implicit allows you to browse, search and open intelliflo office records including clients, leads, service cases, plan and tasks directly from Outlook. To launch the browse window, click the drop-down arrow next to the browse button on the top-left corner of the side-panel and select the record type. Clicking the browse button automatically sets the previously selected record type.
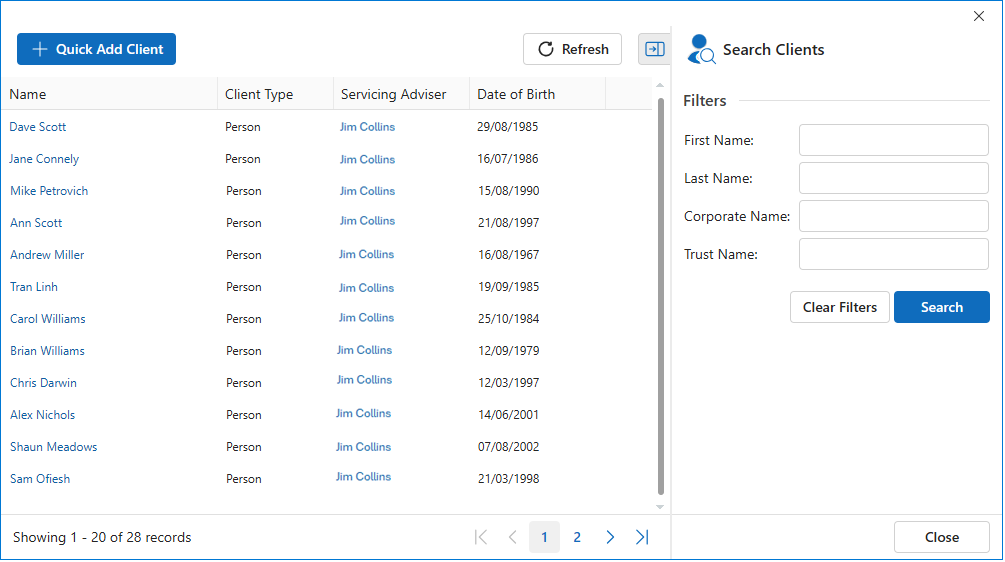
The browse window displays a list of records. The example below shows browsing/searching for clients
Actions
- Use the filters on the right-side pane to search by First/Last name or corporate/Trust name.
- Clicking the name of the client open the record in intelliflo office
- To easily add a new client, click the ‘Quick Add Client’ button.
Notes:
- Search functionality is available only for clients and leads.
- Sorting by columns is currently available only for service cases, plans and tasks.
Email Archiving
Email Archiving – Admin Settings
Corporate-wide email archiving settings are managed by your administrator via the intelliflo office store. They include:
- Turn on/off attachment archiving.
- Set limit to attachments size.
- Restrict attachments types (exclude specific file extensions).
- Allow users to set their own rules for auto-email archiving.
- Enforce corporate policies for archiving all emails from/to clients and leads:
- All emails received from any client
- All emails received from any lead
- All emails sent to any client
- All emails sent to any lead
Email Archiving – Users Settings
Click the ‘Settings’ (gear) button to launch the user ‘Email Archiving’ settings page:
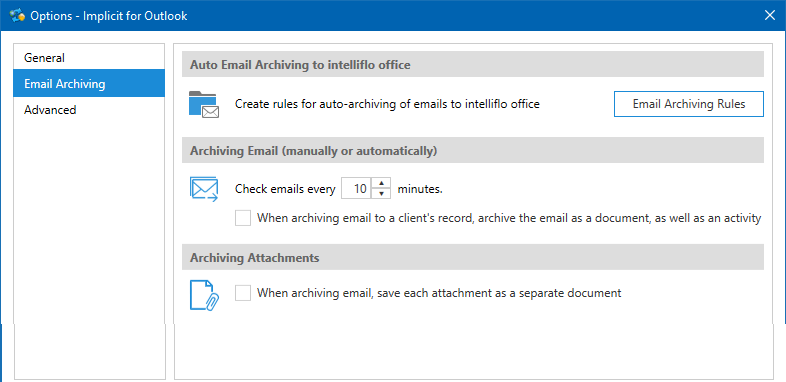
Here, you can:
- Create rules for auto-email archiving (see: Auto-Email Archiving section below).
- Set the interval for how often emails are checked and archived.
- Select:
- When archiving emails to a client’s record – archive as documents as well as an activity.
- When archiving emails – save each attachment as a separate record.
One-Click Email Archiving
To archive an email to a record on the side-panel, simply click the envelop icon next to that record:
The currently selected email will be archived to the record, and you will receive confirmation in the status bar on the bottom of the side panel.

You’ll also notice that the envelop icon turns green and there is a green checkmark added to the email envelop icon to indicate that the email has been archived to this record. This is a persistent indicator that remains as part of the email such that if you close the email and come back to it later, you would be able to see which records the email archived to.
Advanced Email Archiving
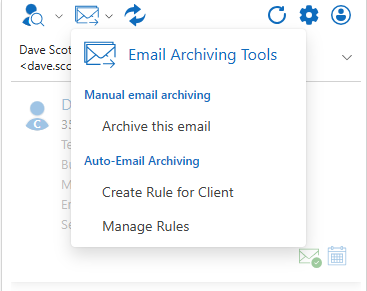
If you need to simultaneously archive to multiple records or modify the subject of the email being archived or need additional options, click the ‘Email Archiving’ button on the side panel and select ‘Archive this email’.
The advanced email archive dialog is displayed:
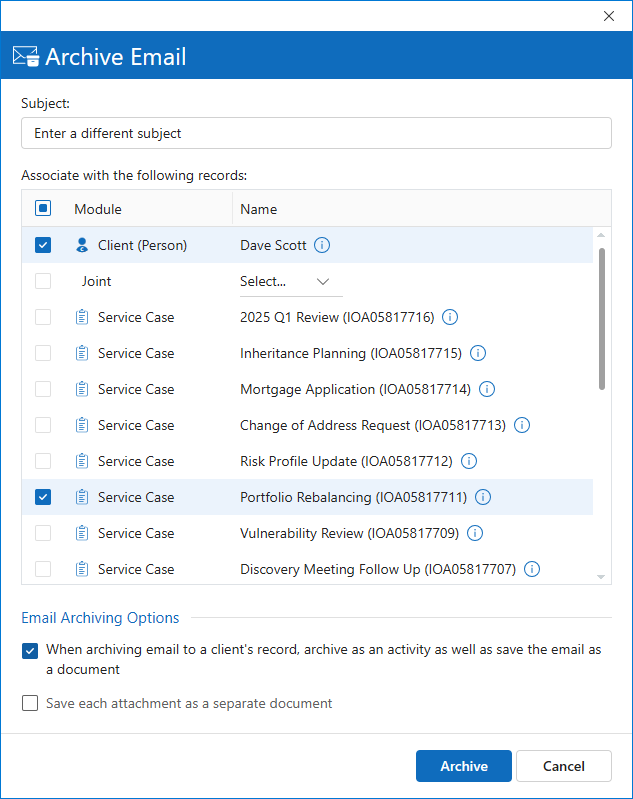
Actions
- You can modify the original subject for the email being archived in intelliflo office by entering a new subject line.
- The client or lead is always selected and is determined by the client/lead that was selected in the side-panel. If you wish to archive the email to a different client/lead, go back to the side-panel, click the drop-down list of related clients and select a different client.
- In addition to archiving a client’s record, you can choose to archive any of the service cases, plans or tasks (Note: you can select up to one record of each type and a maximum of two records.)
- Select the following options:
- When archiving emails to a client’s record – archive as documents as well as an activity.
- When archiving emails – save each attachment as a separate record.
Note: These settings are selected by default based on the settings that were configured under the ‘Options’ tab but you can change them on an email-by-email basis.
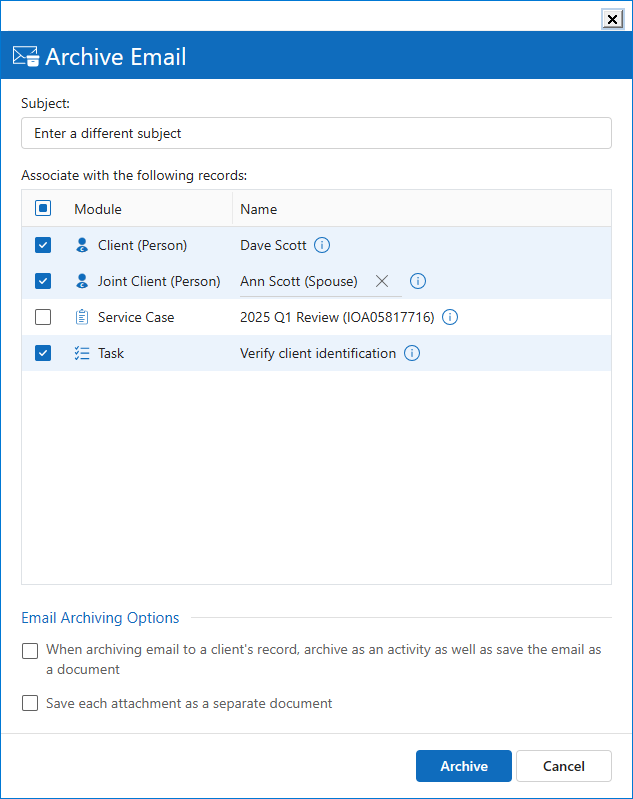
- You have an option of archiving the email to a joint client by selecting it from the drop-down list and checking the box. If you do select to archive a joint client, note that the list of service cases, plans or tasks will be filtered to show only the records that are shared between the primary and the joint clients.
Auto-Email Archiving Rules
Implicit offers a rule-based engine for archiving emails. Similar to Outlook’s native rules engine, you can define different rules for email archiving in intelliflo office.
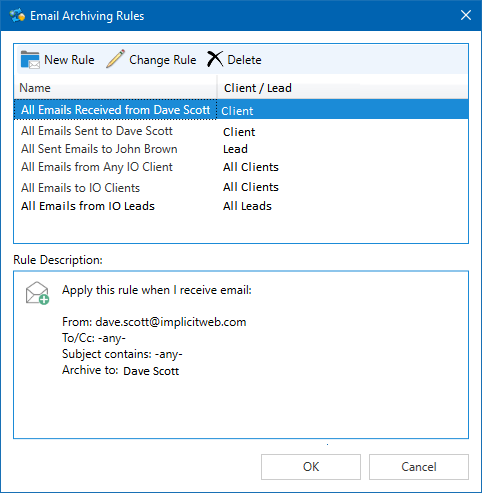
You can create new rules, modify or delete them.
As you can see from the screenshot above, rules can be created individually for clients or leads, and for inbound or outbound emails. Your admin can also enforce corporate-wide rules to archive emails from/to all clients or leads.
Managing Rules
To manage auto-email archiving rules, click ‘Manage Rules’ from the ‘Email Archive Tools’ menu:
You can create a rule for a client or lead based on the currently selected email or select ‘Manage Rule’ to view the list of rules you have defined.
Creating a new Rule
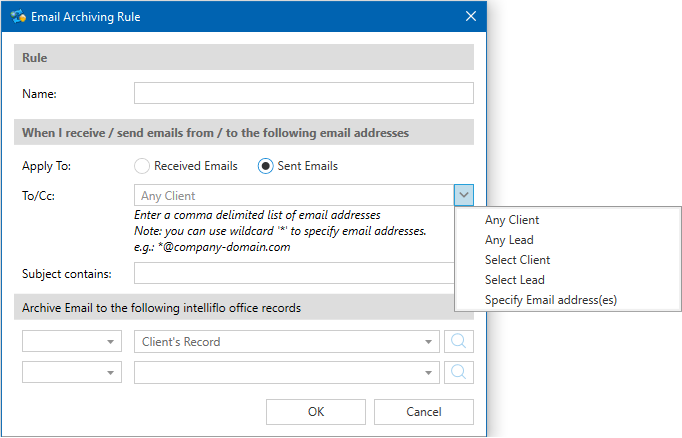
An auto-archiving rule consists of the following:
- Rule Name – Assign any name which is meaningful to you
- Apply To – Choose to apply to received emails or sent emails.
- From / To:Cc – Is set to ‘From’ if you’ve selected ‘Received Email’ or ‘To/Cc’ if you’ve selected ‘Sent Email’
- Email Addresses – The email addresses from which the email was received from or sent from. You can manually specify one or more email addresses (separated by commas) or click the drop-down list to select one of the following options:
- Any Client – Select ‘Any Contact’ if you would like to create a rule that applies to all emails from/to any intelliflo office client.
- Any Lead – Select ‘Any Lead’ if you would like to create a rule that applies to all emails from/to any intelliflo office lead.
- Select Client / Lead – Allows you to select a specific client or a lead from intelliflo office and apply the rule to any of the email addresses defined for this client/lead.
- Specify Email Address(es) – Allows you to simply enter one or more email addresses.
- Subject Contains – Allows you to define rules that are also based on words or phrases in the email subject.
You can select to archive the email to the client’s / lead’s record and if you’ve selected ‘Client’ you can archive to an additional record such as service case, plan or a task.
Synchronizing Outlook and intelliflo office Calendars
Configuring Calendar Sync
If you wish to sync your Outlook and intelliflo office calendars, make sure to turn it on via the Options page:
- You can select a specific direction or select both for two-way sync.
- You can turn on auto-sync of meetings that include intelliflo office clients or leads in their attendees’ list. In which case, such meetings will be automatically synced without having to open the side-panel prior to sending the invites. You also need to select the category and type to use when meetings are auto synced. For more information see: Auto-Sync of Meetings
- If you wish to have synchronization running periodically in the background – Turn on ‘Periodic synchronization’ and specify the interval (By default: 30 minutes, Minimum: 20 minutes). If you don’t turn on ‘Periodic synchronization’, you’ll need to click ‘Sync Now’ on the side panel to trigger a sync cycle.

Important Note: Only meetings where you are defined as the organizer will be synced from Outlook to intelliflo office and vice versa.
Syncing Meetings using the side-panel
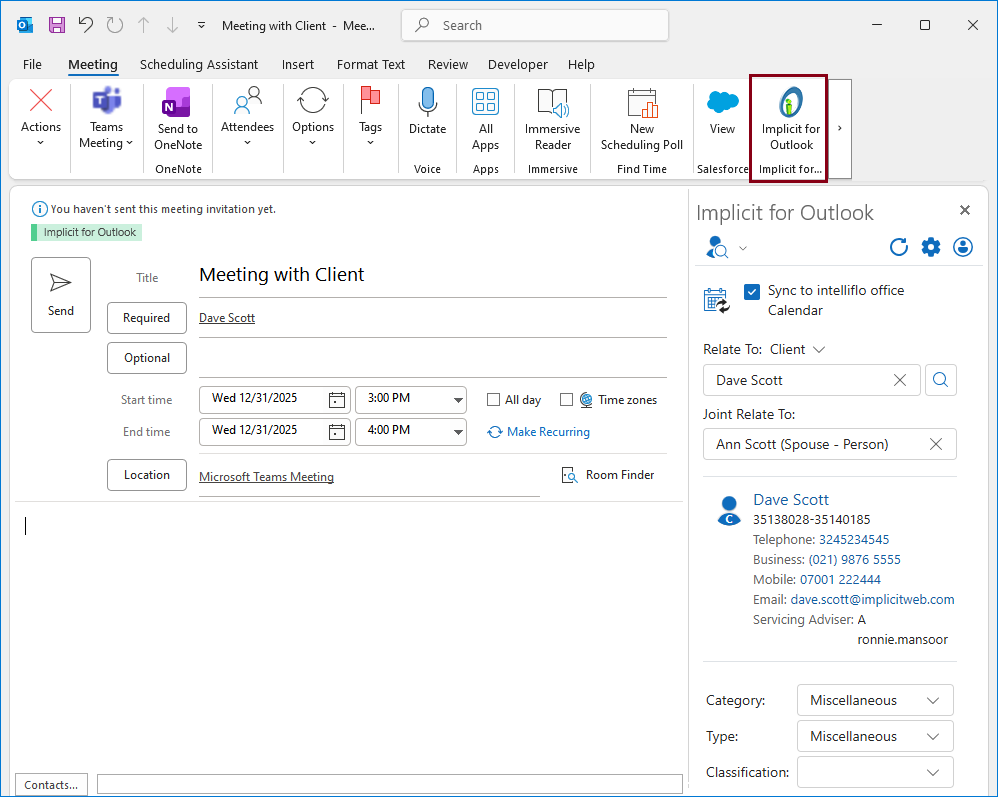
When you schedule a meeting with a client or a lead via Outlook, before you send the meeting invite, click the Implicit for Outlook button on the Outlook’s ribbon. Implicit’s side-panel opens up and allows you to select whether or not this meeting should be synced to intelliflo office and the client/lead that it should be related to.
You can also select to related to a joint client.
By default, the client/lead will be automatically selected based on the email address that you specify in the meeting invite attendees’ list.
You can also select the category, type and classification of the appointment that would be generated in the intelliflo office diary, and send the invite.
The meeting will be marked for synchronization upon the next cycle.
Auto-Sync Mode
The previous method of syncing meetings via the side-panel required you to always remember to click the Implicit button to display the side-panel prior to sending the invite. To assist you in case you forget to click the button, Implicit has also introduced an auto-mode of meeting sync. If auto-mode is turned on via the Options page, Implicit will examine the attendees’ list of all meeting invites that you send out and if an intelliflo office client or lead are detected, the meeting will automatically be marked for synchronization. In such cases, the values that you select for category and type in the Options page will be applied.
Synchronizing intelliflo office appointments to Outlook
If you’ve configured meetings to sync from intelliflo office diary to Outlook, any new, modified or deleted meetings in intelliflo office for which you are the organizer will be synced to your Outlook calendar automatically on each manual or periodical sync cycle. Those meetings will show up in your Outlook calendar with the green ‘Implicit for Outlook’ category.
Triggering a sync cycle
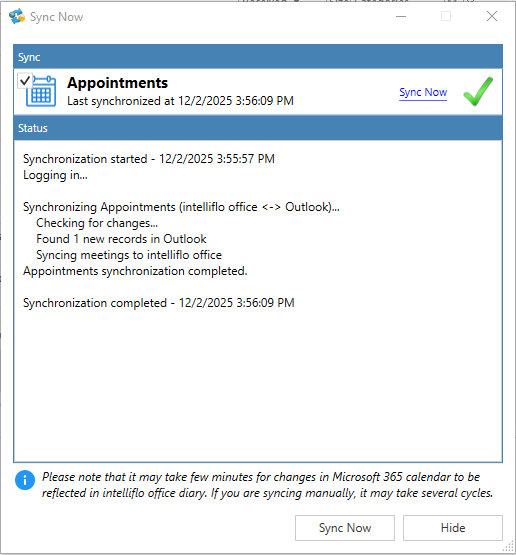
Calendar sync cycles are triggered either periodically in the background (if you turned on ‘periodic sync’) or manually if you click ‘Sync Now’ in the side panel.
If you click ‘Sync Now’ the following dialog comes up and displays the synchronization status.
Options
General Tab
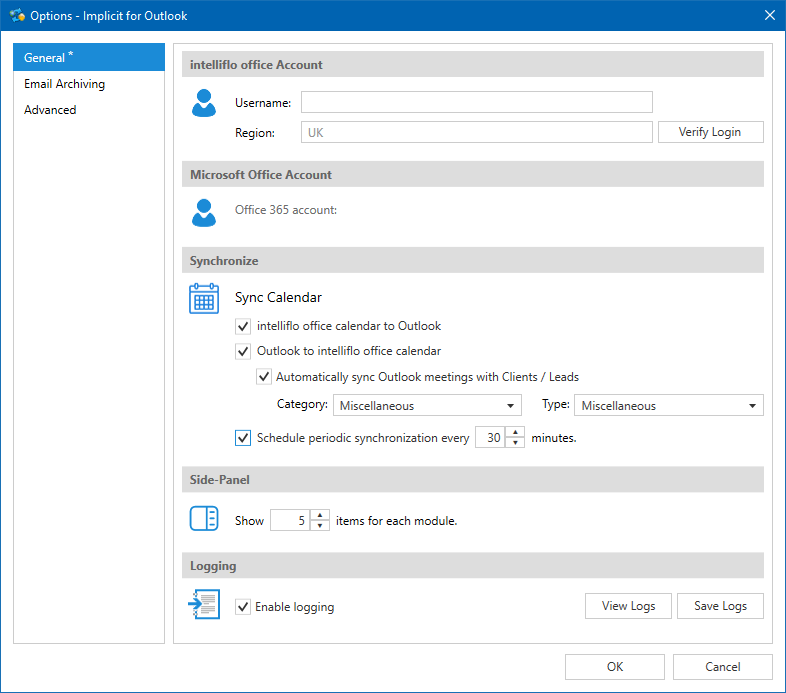
The general tab allows you to:
- View the intelliflo office account that you are logged into. ‘Verify Login’ allows you to confirm that you are able to connect and login to intelliflo office from Outlook.
- View the Microsoft 365 mailbox that you have linked to your intelliflo office account.
- The ‘Synchronize’ section includes all the settings for meeting synchronization. Please see: Meeting Sync Configuration.
- Under ‘Side Panel’ you can configure the maximum number of records of each type to display in the side panel.
- Logging – Used for troubleshooting.
Email Archiving Options
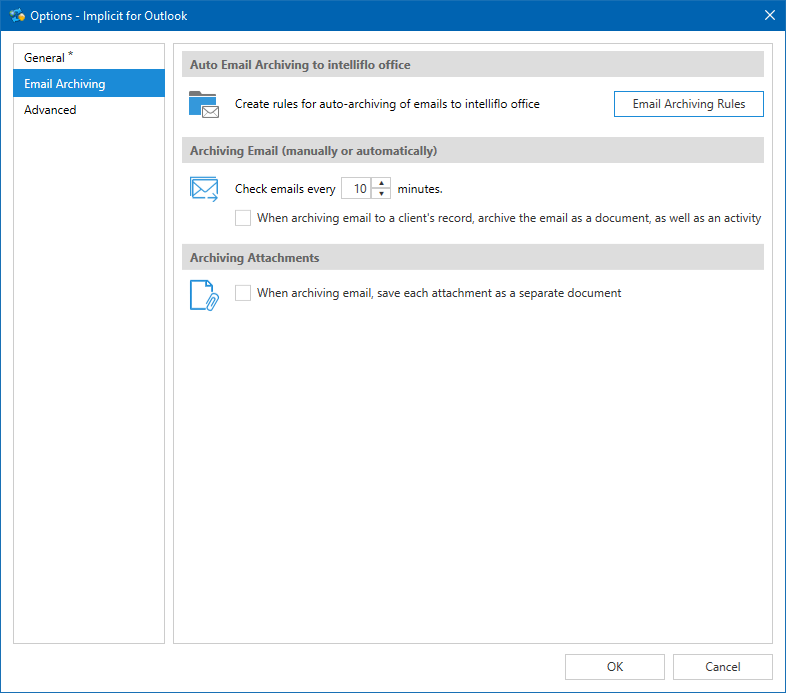
The email archiving tab contains all the settings for email archiving. Please see: Email Archiving – User Settings
Advanced Options
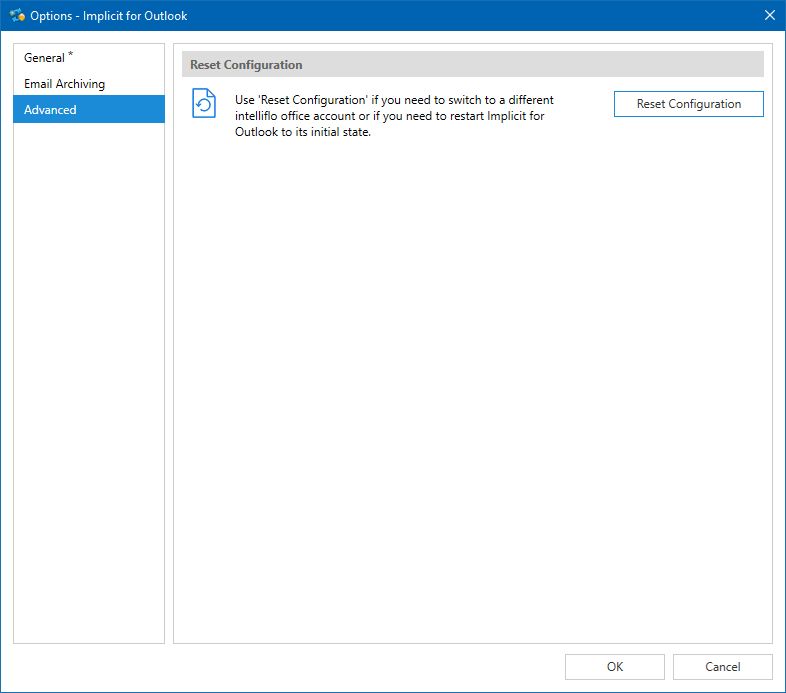
You can use ‘Reset Configuration’ if for any reason, you need to switch to a different intelliflo office account or Microsoft 365 account. If so, clicking ‘Reset Configuration’ will clear your current settings and allow you to switch accounts. It can also be used by customer support to restart ‘Implicit for Outlook’ to its initial state.